
PixiWeb - Virtual Photo Booth
Virtual photo booths for events. No technical expertise needed.
PixiWeb is the easiest way to build online photo booth websites that encourage event guests to create and share branded content.

What is a virtual photo booth?
Virtual photo booths started out as marketing tools for online events, but have rapidly evolved into powerful attendee engagement solutions for hybrid events and live events.
While the idea of online photo booths for virtual events seemed novel as a way to keep virtual event attendees engaged during Zoom sessions and virtual conferences throughout COVID times, as live events started coming back across the globe it became increasingly more obvious how powerful of a solution virtual booths could be.
Take your marketing efforts to the next level and elevate your attendee engagement by creating a virtual photo booth with PixiWeb. Get more user-generated content at your events while providing your guests with a fun and interactive experience!
PixiWeb virtual booth can be used as a standalone website or it can be embedded into a number of leading virtual event platforms without any technical expertise! In Airmeet’s article, Virtual/Hybrid Events & Virtual Photo Booths – A Match Made in Heaven, virtual photo booths are referred to as “the game-changer in online events”!
Who PixiWeb is built for…

We created our virtual photo booth software tool for event planners, conference planners, marketers and the like to create an opportunity for event attendees to connect and share photos via a simple online photo gallery.
While one of the main tenets of our virtual photo booth is just that, a virtual photo booth, the reality is that PixiWeb is a stellar online shared photo gallery that boasts a super fun photo booth interface for capturing images built like a take no prisoners, no-code photo website builder for the digital marketing set.
The other side of the coin, the shared photo gallery aspect is really the trojan horse of the entire platform. While it’s great to see attendees snap fun selfies during your event it’s even more fun to see your attendees share the myriad ways they capture all of the aspects of your event.
Whereas in the past we’ve had to rely on encouraging users to share their photos on social media with a specific hashtag to gain access to UGC and understand its impact; with PixiWeb you are providing event attendees with a centralized place to upload and share their photos, event organizers a way to capture all of the UGC, and a surefire way to measure the outcome of all that engagement. This provides a variety of opportunities for the event organizers and marketers alike!

Easily set up an online photo booth in just a few minutes!
Easy to create custom virtual booths with our no-code self-service website builder
Budget-friendly because you don’t need a coder or other 3rd party to do it for you
Any event professional or marketer has the skillset needed to launch a virtual booth in just a few clicks
Wow your attendees and keep them engaged
Elevate your social media presence with branded user-generated content
Manage all of your photos and keep everything organized for future marketing and promotion efforts
How our virtual photo booth software works

PixiWeb is built with “single-player mode” first and foremost in it’s design. This means that a single event professional can use the software to easily create campaigns, add custom designs, and distribute the link to event attendees.
While the early days of PixiWeb saw us building events in an a la carte format, we had the sneaking suspicion that many of our more successful clients would opine for the chance to build virtual booths on their own and deploy PixiWeb campaigns at will. This suspicion was quickly confirmed by come of our more ambitious partners in the higher education space.
Once you’ve signed up for your PixiWeb account via our website you’re already half-way there in your efforts to build and launch your first PixiWeb campaign. Simply put, once you’re logged in to your PixiWeb account all you need to do is click the “Create Campaign” button in the top right corner and follow the next steps. From there the PixiWeb event builder will walk you through the naming process right off the bat.
The PixiWeb event builder is laid out in three distinct sections: Information, Settings and Design. We’ve laid out the step through process in this manner to make for the easiest and most intuitive builder you can imagine.
Virtual Photo Booth Campaign Builder
Section 1: Information

The Information section of the PixiWeb event builder starts with completing the title of your event, followed by the description, and then the start and end dates that your event or campaign will take place.
These items are important because two of the three, the title and description respectively, will appear on the landing page for your event for all of your attendees to see and read so you’ll want to make sure it’s clear, concise and without typos. In the event that you need to tweak some copy or the title of your event changes you are able to go back and edit those details post-launch.
The start and end date indicate when the PixiWeb event will be in “Live” mode which denotes whent the website will be available to have photos uploaded to it. Once your event concludes it’s “Live” time, the landing page will convert to let attendees know that they are no longer able to upload photos and will redirect them to view the gallery page.
To that end, the gallery of images collected during the event will stay “Live” for attendees, organizers and any other associated partners to access in perpetuity for viewing while the account holder will have access to all of the content from the back end as well as have the ability to bulk download all of the images. Additionally, PixiWeb will act as a repository for all of your event images so rather than needing to painstakingly download, organize and store all of that content; you can use PixiWeb as your centralized place for keeping track of all of your event photos.
Virtual Photo Booth Campaign Builder
Section 2: Settings

As we mentioned earlier, PixiWeb is a wonderful tool for creating a virtual photo booth but it’s also so much more when you tap into the other “Modes” that the tool features. Using PixiWeb for different purposes necessitates different user-flows so we developed our four different “modes” to help accentuate those different use cases.
The four different modes PixiWeb boasts are Virtual Photo Booth mode, Shared Gallery mode, Portfolio mode, and Embed mode.
We go into detail about the different modes and how you can go about using them here but to make the long story short; the optimization you need to embed a PixiWeb gallery in a platform like vFairs or Hopin is significantly different than what you would need to deploy your PixiWeb campaign in the live event space. Modes make it extremely simple to dial up the appropriate settings and optimization that your event requires.
That being said, switching between PixiWeb Modes isn’t the only thing you can customize in the Settings section. Below the section where you can choose which Mode is best for your campaign or event you’ll find toggles to enable the Slideshow Feature which adds a simple yet deceptively effective way to display the content that has been uploaded to your PixiWeb gallery. The slideshow feature can be deployed to great effect in virtual environments by embedding it in an iFrame. In addition to its application in the virtual environment, Slideshow is an amazing tool in the live event space as well. When running in Virtual Photo Booth mode your slideshow will be available through a unique URL that allows you to connect any monitors, projectors or other display systems in your venue to.
One of the more attractive features here is that your PixiWeb Slideshow will continuously auto-update so as attendees are adding new content, it will be included in the slideshow allowing you to effectively create an entirely new experience from the same basic tool. Cool, right?
The other two options you need to consider in the Settings section are allowing attendees to send their photos via SMS as well as adding a four-digit pin to protect your PixiWeb campaign from anyone you don’t want having access to it. If and when you do need to deploy the four-digit pin, you’ll be prompted to choose the four-digits your attendees will need to enter so you can make it something that’s easy to remember and/or give you the ability to change it if need be.
Virtual Photo Booth Campaign Builder
Section 3: Design
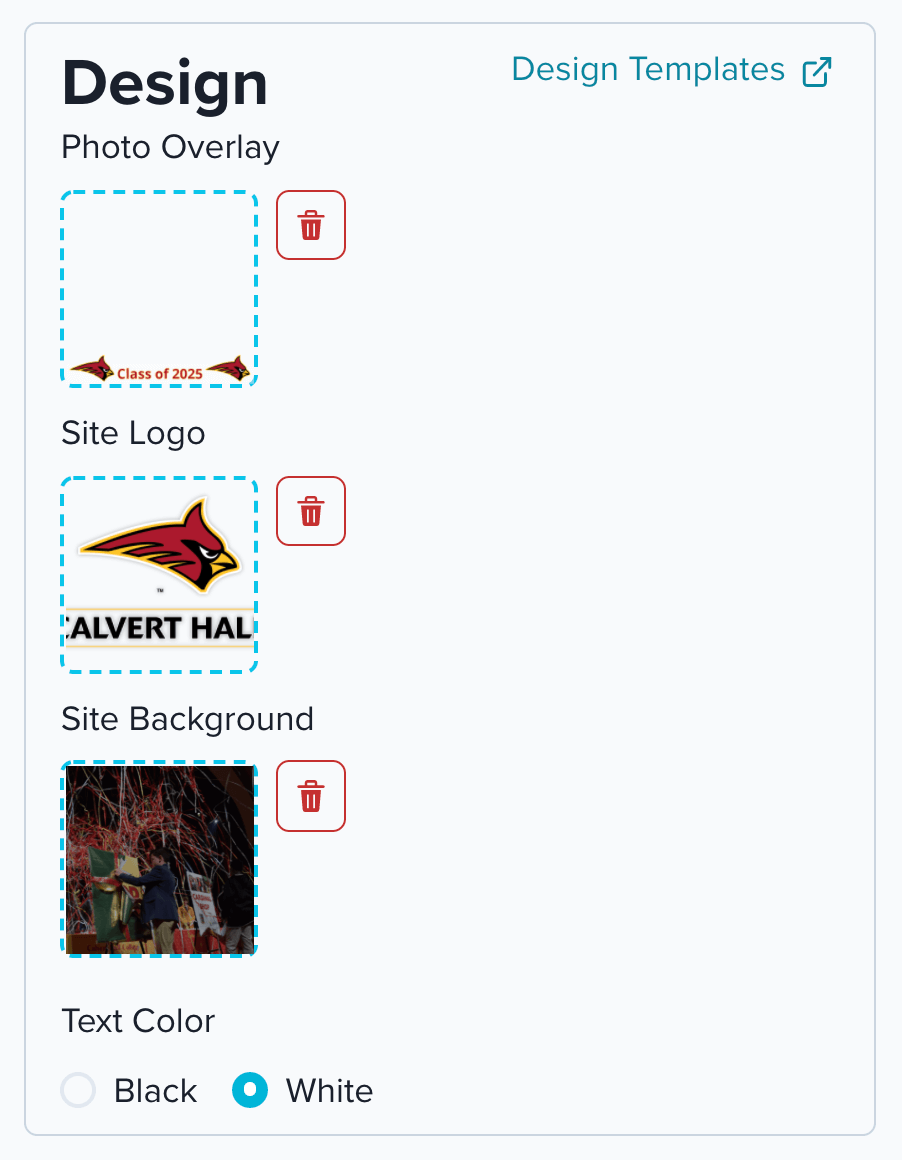
The last section of the PixiWeb event builder is the design section that is laid out with options to customize the Photo Overlay, the Site Logo, and the Site Background through a simple drag & drop interface.
The ability to customize these three elements of your PixiWeb event are based heavily on providing our clients with the opportunity to make their PixiWeb event look and feel as much, or as little, like their event so if your event has a specific theme, brand or logo that needs to be represented it’s very easy to accomplish.
The design section of the PixiWeb event builder also features a link out to Design Templates for Adobe Illustrator as well as Canva to make the design process stress-free and accessible to anyone. Additionally, each section of the design area provides all of the information needed in the design process should you need to use a different design tool from the two we provide templates for.
Photo Overlay
The photo overlay is the design that gets applied to each of your users’ photos and can include a border, frame, or a simple logo watermark. During the design process it’s important to keep the graphics around the edges of the frame, otherwise the overlay is likely to block parts of the subject in the photo.
An overlay that takes up too much real estate will cause the graphics to clash with many of the photos. The center of the overlay should be clear. The size of the photo overlay is 1000px x 1000px (72 DPI) and it must be a transparent .png file.
Site Logo
The recommended size of the site logo is 800px wide x 400px tall. If your lofo is more square or round (a 1:1 height to width ratio), we suggest a size of around 600px x 600px. If your logo is very flat and wide, you can aim for a size of approximately 800px wide x 200px tall. The logo will be displayed on the landing page and gallery page.
Site Background
The size of the site background is 1250px wide x 800px tall. This part of the design is not required and will default to a white site background if you do not include it. Like most websites, the background image must be one that is not overly busy or distracting. It also must contrast nicely with either white or black text, otherwise the user will have trouble reading the PixiWeb site text and prompts.
We suggest using a color, gradient, pattern or an abstract image - something that will not be obstructed when scaled differently by different screen sizes, or by other site elements (like the logo) that gets placed “on top” of it.

The diagram above shows the elements from the campaign builder and how each corresponds to the display of the live virtual photo booth website.
See how easy it is to to create your virtual photo booth.
Watch the video above for a quick tutorial on “How to Create a Campaign" using our virtual photo booth software.
Getting the word out about your virtual photo booth is the key to success!
The single most important element of any successful PixiWeb campaign is how you go about the distribution process. It’s no great secret that without users getting to your virtual photo booth there will be little to no engagement in the gallery.
After over a decade of experience in the photo booth rentals and photo booth software businesses, our founders learned that without proper signage, promotion and communication, attendee engagement can be underwhelming. We’ve learned a thing or two over the years and we’ve set out to change that.
Once your PixiWeb event is fully built, customized and designed it’s time to get it out to the people.
The primary ways you can drive traffic to your PixiWeb event is via the unique URL for your site that can be used anywhere a link can be clicked; think email and text marketing, social media posts, website navigation and buttons. Additionally, you’ll want to use QR Codes to help drive traffic to your site as well.
QR Codes are a great way to encourage users to access your PixiWeb event from their mobile device which gives them greater access to past photos they may want to share, a higher quality camera as well as keeping them from clicking away from the virtual programming you’re offering. Another side benefit of leveraging QR Codes with your PixiWeb event is that they’re a tremendous way to take your virtual photo booth into the live event space by integrating them into posters and signage.
We’ve made both of these two distribution methods a cinch by building in Bit.ly link shorteners as well as a QR Code generator for every campaign right in the event builder as we mentioned above. In doing this, PixiWeb saves users two additional steps and a ton of time. In short, when you build a PixiWeb event, you’ll find everything you need right there inside our platform. No fuss, no muss.
Because we’ve done this once or twice, we’ve put together this simple infographic to help you have success with your virtual photo booth engagement.
Click on the image to download a PDF of The PixiWeb Success Playbook.

For your attendees…because that’s who this is all about!

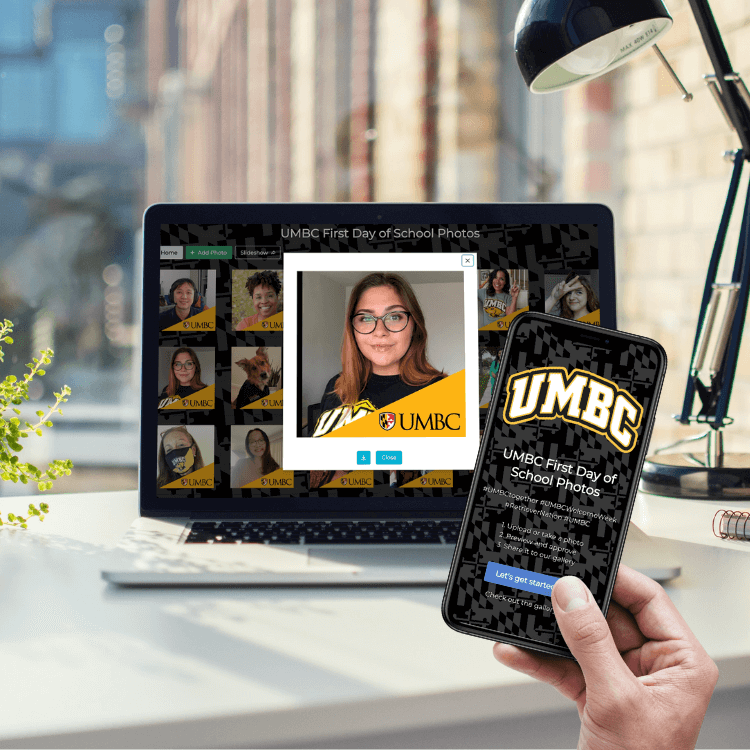
The process is simple, painless and fun. No apps to download, no restrictions for different types of phones or computers. Just a fun photo sharing experience for everyone.
When your attendees click the unique URL or scan a QR Code their experience will begin by launching a custom branded landing page for your event. Once there, they’ll be able to read about what the event is for as well as follow a few simple instructions that lets them know how to navigate the virtual photo booth experience.
Step-by-step, your attendees will be guided through the process of taking a photo or uploading a one from their camera roll, previewing the creative photo overlay frame for the event, approving the image, agreeing to the Terms of Service & Privacy Policy, downloading their photo, and perusing the other photos uploaded by other event attendees.